Showing posts with label how to. Show all posts

Tuesday, December 11, 2012

Sewing Tutorial: Baby Sleep Mittens

No matter how much we turn up the heat in the house, our bedroom always feels much colder than the rest of the hosue.  Lots of covers and warm jammies keep us warm, but we have a new roommate. And despite Tommy's layers and warm blanket sleeper, his poor little hands would become ice cubes by the time he woke up next to nurse.

So I made him a pair of baby mittens from an old felted sweater.  Here's how I did it:

I folded my felted wool fabric in half lengthwise and drew a mitten shape with chalk, eyeballing the size.  (If you're smart, you'll either generously trace your baby's hand, or measure the circumference of his wrist, or ideally both.  Eyeballing it wasn't my most shining moment in the fit department, but I was short on time, the baby was asleep and he needed to wear the mittens the same evening.  Sewing time is scant these days!)  I then cut out two of the mitten shapes, keeping in mind the need for a 1/8- to 1/4-inch seam allowance.


I cut a piece of elastic about 3/4 the length of the wristband and sewed it to the wrong side of the wristband, stretching it as I sewed.


Next, I folded the mitten in half lengthwise, right sides together and stitched as close to the edge as possible.  Be sure to stitch through the elastic when you get to the wristband, and not alongside it.


Turn mittens right side out and fit them onto your baby's chilly paws.  Hopefully yours fit your baby better than mine do!


Check my night vision -- I love the arms-over-head look.
 
 
Along the same vein, I made a pair of slippers for Nathan using this tutorial from Collecting the Moments. 


I used puffy paint to make the bottoms non-slip, or less slip, anyway.  I couldn't get this kid to stand still if I paid him!

_____________________________________________________________

For my babywearing friends: Paxbaby.com is hosting a giveaway to celebrate reaching 10,000 Facebook fans.  Enter here for up to 20 chances to win 10 great prices.  Good luck! a Rafflecopter giveaway

Wednesday, December 5, 2012

Building a Fabric Stash

Wow, guys.  I haven't written in a week and a half!  There is so much I want to write about, but I have less free time than ever.  Although Tommy is a good sleeper at night (he's been sleeping for 5-6 hours straight since he was 5 or 6 weeks old!) he doesn't sleep that well during the day.  Getting one of his cat naps to line up with Nathan's afternoon nap has been quite the worthy challenge.  And he doesn't start sleeping soundly at night until 10 p.m.  And condsidering that he nurses every hour and a half on the dot (or less), it' s a wonder that I get anything done, let alone the fun stuff. 

So without further ado, here's some fun stuff:

 
I've been buying fabric here and there for specific projects since purchasing my sewing machine back in March, but only with this last purchase did I realize that I'd been following a strategy for how I was building my fabric stash.  Unconscious Fabric Stockpiling (UFS) -- is that a disorder?  Like the people who sleepwalk to the refrigerator and stuff their faces in the middle of the night?
 
It's simple -- I've been buying more fabric than I actually need.  Or, UFS. Buying a bit more fabric than I need for a project isn't just smart sewing, it's how I've been growing my useful and productive stash.  Much of my leftover fabric already goes together, and if you're drawn to the same colors over and over again like I am, you'll have countless combinations to work with as your stash grows.
 
I've been sewing small Christmas presents during my scant free time, and I feel very pleased (and satisfied -- is that wierd?) that all of my projects are coming directly from my stash.  Even the fusible fleece, thread and emboidery floss.  (Yeah!!!)  I also made the crayon roll I sewed for Nathan's birthday entirely from my stash.  I love how easy it was to select coordinating colors -- a no-brainer because I already did all the sweating it out over what fabric to buy and how the colors work together when I bought the fabric for the original project.  Opening the doors to my fabric stash is getting to be a little like going to a [very small] fabric store.
 
In the photo above, I bought the first three fabrics on the left for an apron for Nathan.  (All four fabrics are from the Woodland Tails collection by Sherri Berry designs, blue pallet.  I know, it's too nice for an apron, but I have nothing else lined up for it.  Should I do a quilt instead?)  I loved the collection so much that I bought the fabric on the right to make Thomas a pair of reversible shoes.  (Baby deer, giraffes and toadstools all on the same fabric?  Yes, please!)  So of course I had to buy some extra blue dot fabric for the lining.  While I was at it, I bought some extra deer/giratte/toadstool fabric -- and I already knew I'd end up with more stripe and animals fabric than I needed for the apron.

What else will I make with all the leftover fabric?  Who knows?  That's the fun of having a stash.  Someday I'll have a project in mind and I'll know exactly what fabric I'll make it with.  And I'll be able to start it right away.  Or, as soon as I can squeak some free time outta these boys.  I love being able to start on a project as soon as inspiration strikes!
 

In today's mail I received this laminated fabric to make a smock for Nathan.  The fabric is Bermuda Owls from Robert Kaufmann's urban zoology line -- I received it already laminated from from the Laminates Etsy shop. I'm excited to get started on the smock for one of his Christmas presents, and I also see some nifty pencil cases in my near future.

My name is Kelly and I have UFS.  I buy more fabric than I need.  What is your your affliction?  I mean, what are some of your stash-building tactics?

Saturday, December 31, 2011

Knitting Technique: How to Wrap & Turn


Ever see the abbreviation w&t on a pattern and wonder what it means?  If you bought my Birds in Flight Socks pattern you may have, because I forgot to define it.  (I appreciate the patterns that define the less-common knitting techniques…But if you work short-row heels as often as I do, maybe this one doesn’t seem uncommon.)

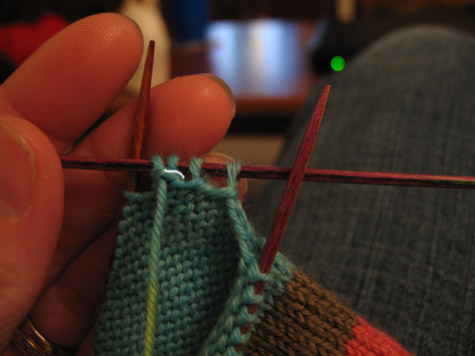
Anyhow, w&t means wrap and turnyou’re wrapping the last unworked stitch with the working yarn and turning your work.  Here’s a tutorial with photos:


1. Knit to the last unworked stitch (or wherever your pattern calls for you to wrap and turn—it’s not just for socks, you know) and move your working yarn in front.  (If you’re purling, bring the working yarn to the back of your work.)

  
2. Now slip the next stitch (the stitch to be wrapped) from your left needle to the right needle, keeping the working yarn in front.

  
3. Now turn your work.


4. Slip the stitch to the wrapped from the left needle to the right needle.


5. And start working back across the row, in this case, purling. 

The white line highlights the wrapped stitch on the wrong side of the fabric:


Here’s what it looks like from the right side of the fabric:


See the little wrap?  So cute.  And functional!  In another tutorial I’ll explain how to pick up these wraps when turning the heel of a short-row sock.  You won’t want to miss it!

Sunday, November 13, 2011

How to Save on Groceries & New Rhythm

Although we’ve always looked for ways to save on our grocery bill, a recent and hopefully temporary shift in my workload has forced us to buckle down, take an even closer look and get creative.  It’s also helped me to examine our family’s weekly rhythm and make a few positive changes.  I’m seeing how these two things go hand-in-hand.

A good friend loaned me the book Miserly Moms, and it’s giving me some good ideas and, better yet, it’s helping to spark some of my own ideas that will work for my family.  Some of the stuff in the book I’d already figured out through common sense and have been applying for years, but other parts are purely inspiring, such as the idea that being frugal doesn’t mean you’re depriving yourself.  A-ha!

I’ll skip the obvious money-savers, but I thought I’d share some of my own tips and tricks that I’ve been using over the years and a few new ones that just came to me within the last week.  I hope some of them are helpful to you and your families!  After that I’ll share our updated family rhythm, which combines my recent goal to get more organized and our family’s goal to spend less money on groceries.

Here goes!

1.  We buy generic brand groceries whenever possible.  Whenever possible actually means whenever we can tolerate it.  For some products, the price savings just isn’t worth the sacrifice in taste or quality.

2.   We only buy chicken and beef when it’s on sale.  We stock up on chicken especially when it’s on sale so we’re not without it during all the weeks it’s not on sale.

3.  We’re going to try making homemade treats, like cookies or brownies, and breads, instead of buying ready-made ones at the store.  This is a no-brainer for those like me who love to bake, but it’s going to take my husband some time to adapt.  He loves his Entenmann’s.  As for breads, we buy sliced bread and Italian loaves for sandwiches and sometimes rolls for specific meals.  We always eat the bread, but the rolls sometimes get forgotten or we just can’t finish them.  This is when I should be making time to bake bread and/or freeze the remainder of store-bought rolls before they get stale.  I plan to experiment to find out what baked goods freeze well, and which doughs freeze well so we can pop rolls in the oven when we’re short on time.  I’ll keep you posted!

4. We’re going to have breakfast for dinner at least one night each week because it’s so inexpensive.  Last week my T.J. made quiche Lorraine; this week I’ve already made French toast.  Eggs and bread are cheap and we can often find bacon buy-one-get-one free.  For breakfast sandwiches and quiche, you can cut the pound of bacon in half and use just half of it now.  Wrap and freeze the second half for later.

5.  We’ll also have pasta at least once a week.  My husband makes his own tomato sauce, which is dirt cheap, and we freeze it in batches.  We’ll need to get creative in this area, as he prefers having chicken or eggplant parmesan.  I’m dying to add zucchini or summer squash to my pasta and tomato sauce and have is sans meat.

6.  We need to try much harder to eat everything that we buy, including leftovers.  Too often, we don’t eat all of something or we don’t finish our leftovers.  I’ve always felt bad wasting food, but now I feel even worse when I think about all the cold, hard cash we’ve been wasting over the years.  Since we had to throw out everything in our fridge after the snowstorm and power outage, we’re starting with a clean slate—a perfectly clean and still empty-looking fridge.  I hope this will help us see and notice what’s in there so we actually eat it before it gets too old.  Same with our freezer.  (P.S. – This is going to be harder than it sounds because my husband has been ServSave Certified and he knows more about food safety than your average person.  He won’t let us eat food that’s more than two days old.)

7.  Labeling leftovers.  I mark Nathan’s leftovers so our babysitter knows what to feed him for lunch on the days I work, but I’ve always neglected to label our own.  Who wants to open an oddly shaped foil package of who-knows-what only to guess at how old it might be?  That’s an intimidating task, one we all to often skip, letting perfectly good leftovers go to waste.

8.  As soon as we get our groceries unpacked and put away, we write up a menu for the week.  We’ve been doing this for years to keep track of what we have on hand, especially for dinner, our main meal.  It stinks finding out that you’ve let vegetables go bad because you forgot about your plan to make stir fry later in the week.  Also, writing out our weekly menu helps us identify which meals need to be made earlier in the week while the ingredients are still fresh.

9.  We plan to stretch our meat further than we’ve ever stretched it before, although I don’t have a plan for this one just yet. 

10.  We’re trying to use less paper towels by using rags and reusable cloths to wipe down the counters.  We’ve always used regular hand towls for drying hands and dishes.  But I won’t give up paper napkins just yet… I have enough laundry to do, thank you!

I hope these tips help some of you or maybe hehlp spark some ideas of your own!

Weekly Menu & Daily Rhythm:

Monday, July 18, 2011

Resourceful Photo Scrap Note Cards

** UPDATE: Don't forget to enter to win my awesome handmade note card giveaway!  Entries are open until 8 p.m. on Monday, August 1.  There are up to six ways to enter! **

You might remember from other posts that I value resourcefulness and keep odds and ends that might be useful for future crafts.  Like the faux leather box for my accordion photo box gift for Father’s Day or glass jars for my leaf decoupaged jars.  So it should be no surprise that I save scraps of paper leftover from scrapbooking and other paper crafts and the edges I trim off photographs.  I also save interesting pieces of product boxes.  Here’s a look into my scrap drawer:


Someday I'm sure I’ll know someone who’d like a Hello Kitty note card!  See all the photo scraps?  Those are leftover from my accordion photo box, and they were the inspiration for a series of note cards I just made.

I arranged the photo scraps into categories based on subject matter.

 
The setting sun on these fence posts was my favorite grouping. 
I then dug around through my bigger scraps to find paper for layering and the paper that will be the note card itself.  It turned out that I had to use a new sheet of paper for the card, because the note cards came out on the big side.


I’m no longer a fan of measuring for projects like these.  My strategy for getting even cuts is to glue down the photo and then [carefully] make the cuts.


After I matted my three photo scraps….


 I glued them down onto a large piece of scrapbooking paper and then trimmed it down to size.


Gah!  My handwriting is so terrible.

And then I made another!  One was for my friend’s son’s first birthday (I wrote about his awesome animal-themed party yesterday, in case you missed it) and the other is for Betsy, who is the brains behind the knit for Japan effort on Small Things.


If you plan on making note cards to put in the mail, you’ll probably want to plant your card to be a specific envelope size, or just make your own custom envelope.

Phoenix’s card was hand-delivered, and Betsy’s card was snuggled in with my knitted items for those who lost everything in Japan’s recent earthquake and tsunami.


In this information age, I’ll never stop reading printed books or sending paper cards in lieu of electronic mail.  I just love how these resourceful photo scrap note cards turned out!

Wednesday, June 29, 2011

Crafting on a Budget

With the cost of everything going up—groceries, gas, electricity, I mean everything—and salaries staying relatively the same, we’ve been looking for ways to tighten our proverbial belts lately.  The good news is not having a lot of money to spend on crafting supplies doesn’t mean you can’t afford to craft—that is, if you know how to craft on a budget.  This topic has been on my mind a lot lately as I scrimp and pinch in some areas (I can be a cheap-ass) in order to spend (or splurge) in others.  Here are some of the common-sense strategies I use to keep crafting affordable yet still creative and fun.

Find money in your pocket? Stick it in a jar. This strategy really works, even if you’re only saving in five-cent increments. The best is when you find a ten-dollar bill in your pocket—don’t put it back in your wallet for convenience store crap or over-priced half and half, stick it in your jar.  The same goes for coins you get back as change—take them from your purse or pocket and deposit them right into your jar when you get home.  Treat it like found money and spend it guilt-free.  Make a deal with yourself that you’ll only spend the money on crafting supplies when it reaches a certain limit; mine is $50.

Do you know why my limit is $50?  It’s because that’s how much you have to spend at knitpicks.com in order to get free shipping.  Why spend money on shipping and handling fees when you can spend that money on yarn instead?

I almost always buy my yarn from Knit Picks’ catalog/website. That’s right.  I don’t need super-expensive yarn in decadent fibers and colorways in order to enjoy my craft.  I knit to knit, moreso than to obtain a finished object (after all, one can just go to the store and buy a hat, right?).  I’ve been buying yarn from Knit Picks for so long and from so early on in my knitting career that I actually haven’t experienced many of those expensive yarns, so I really don’t know what I’m missing (I think not much, but who knows).  I like the fibers, colors and feel of Knit Picks’ yarn, and they keep coming out with new and interesting yarn and colorways.  They’ve come a long way since I found them in 2005, and until they do me wrong, I’m going to stay a loyal customer.  The prices are right!

Find change lying around the house?  Put it in the aforementioned jar.  The change I find lying around usually belongs to my husband, and I started confiscating it years ago when it really annoyed me that he leaves his stuff laying around (it’s more than just a few coins).  I was surprised when he started noticing the disappearance of his spare change, and it eventually motivated him to pick it up and put it in his own jar.  (Damn!)  But he isn’t always so neat, and after a few days on the dining room table or baker’s rack, that change is mine.  I don’t think I would take Nathan’s money it if was lying around, but he’s not old enough to have his own pocket change yet.  And when he is, I hope he’ll save it up in his own jar, just like his mama.

Make a list of your crafting supplies and let the list grow before you go shopping.  It’s hard to stick to a budget when you buy your crafting supplies one at a time, but when you make fewer trips with longer lists the costs are easier to keep track of.  Also, when you have a long list, you’re less likely to buy things you really don’t need.  P.S.: Don’t forget to bring the list with you to the store.  I, um, sometimes forget, which defeats the whole purpose.

Have a plan.  If you’re in the craft store and you want to buy something that’s not on your list, be sure you come up with a plan for it and can really use it.  It would be silly for me to say not buy something that’s not on your list in a craft store (although that’s my general policy for staying on-budget in non-craft stores)—it’s one of the best places to get lightening bolt ideas and formulate awesomely creative plans in the blink of an eye.  So when you do come across something great that you didn’t expect to buy, be sure you have a plan for it before you leave the store, even if it means buying one or two more things for the project before you leave.

Get reacquainted with your stash.  Go through your stash of crafting supplies every few months to remember what you have.  You’ll be surprised about how many items you’ve forgotten about; I did a recent sweep of just my yarn alone and found lots of yarn—and nearly finished projects!—that I had forgotten all about.  It’s astounding, really.   Maybe you’ll get some new ideas to use up the supplies you have and postpone a trip to the craft shop.

Be resourceful.  Save crafty or otherwise useful items you think you’ll be able to use in a craft, but do so sparingly.  Before I throw something away, I ask myself, Can I really use this?  Often times the answer is no, but sometimes I get a yes.  I don’t want to become a hoarder, so if I can’t immediately think of a possible use for an item and it’s not particularly special, I chuck it.  The special ones, like my Huckleberry tea tin from our honeymoon in Yellowstone, are worth saving even without a plan.  I saved a faux leather box from my husband’s wallet to make this awesome photo box for his Father’s Day gift. 

That’s all I have for now.  If I think of any other ways to craft on a budget, I’ll write another post—maybe it’ll become a series!
Related Posts Plugin for WordPress, Blogger...