Showing posts with label knitting tips. Show all posts

Monday, May 28, 2012

A Rant About Blocking (and some tips)

I'm about to embark on blocking several baby sweaters and a shawl -- yes, I sometimes leave the tasks of weaving in ends and blocking to do all at once, although it's not a smart tactic.  And it got me to thinking about the usefulness of blocking.  I mean, we're doing this for a reason, right?

I've had friends ask how they should block their finished objects, and first I swallow the urge to say, "here, let me google that for you."  (Have you ever been to that website?)  And then I say this:
 

  • It depends on what the finished object is, what it's made of and what condition it's in.  A plain old scarf or a hat?  I'd typically skip the blocking step altogether.  But if it's a fancy hat or a lacey scarf, I probably would block it.
     
  • If it's acrylic or some other manmade fiber, don't bother blocking it -- it won't do an ounce of good.  (Here is where I'd try really hard to resist the urge to say something obscene about acrylic.)
     
  • If the finished object is already at the desired measurements and isn't curling or creased, I'd block it lightly by pinning it down and placing a wet tea towl over it.  Remove the tea towel once the object has absorbed most of its water and allow it to dry comletely before unpinning.  A light blocking will make the stitches look more even and help the sweater keep its shape for a little while.  This method is great for baby garments and things you want to gift (or wear!) ASAP.
     
  • Finally, there's the full-soak method for finished objects that really need the help.  This includes lacey shawls that need to be pulled to bigger measurements, sweater pieces with inappropriate curls or off measurements (block before you seam!) or items with noticeable creases.  Soak your finished object for a few minutes until it's completely saturated, then press or roll it between clean towels to remove most of the moisture.  Don't wring it!  Then lay it flat, shape or pull it to the measurements specified by the pattern and pin in place.  Wait until it's completely dry to unpin it.  Now flaunt it like it's the most beautiful thing money can't buy!

And some tips:
 

  • Depending on the object, you'll probably need to block it each time you wash it, so it's a good idea to learn this minor skill.
     
  • Keep your blocking objects in a separate room with the door closed, away from pets and small children.  Just sayin'!  I have three cats who love to sit on wet wool.  Weird, right?  I can say from experience that it's a real pain in the arse when the pins get pulled loose and there's cat hair stuck to my finished objects.
      
  • It's worth it to invest in blocking pins and a real blocking board (and lace blocking wires, if you knit lace).  It makes all the difference in how the object comes out and ease of blocking.  Plus, the initial investment is pretty small.
     

  • Good luck!  If you need help, just google it!  : P

Saturday, December 31, 2011

Knitting Technique: How to Wrap & Turn


Ever see the abbreviation w&t on a pattern and wonder what it means?  If you bought my Birds in Flight Socks pattern you may have, because I forgot to define it.  (I appreciate the patterns that define the less-common knitting techniques…But if you work short-row heels as often as I do, maybe this one doesn’t seem uncommon.)

Anyhow, w&t means wrap and turn—you’re wrapping the last unworked stitch with the working yarn and turning your work.  Here’s a tutorial with photos:


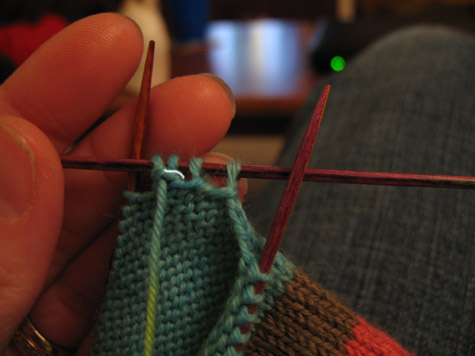
1. Knit to the last unworked stitch (or wherever your pattern calls for you to wrap and turn—it’s not just for socks, you know) and move your working yarn in front.  (If you’re purling, bring the working yarn to the back of your work.)

  
2. Now slip the next stitch (the stitch to be wrapped) from your left needle to the right needle, keeping the working yarn in front.

  
3. Now turn your work.


4. Slip the stitch to the wrapped from the left needle to the right needle.


5. And start working back across the row, in this case, purling. 

The white line highlights the wrapped stitch on the wrong side of the fabric:


Here’s what it looks like from the right side of the fabric:


See the little wrap?  So cute.  And functional!  In another tutorial I’ll explain how to pick up these wraps when turning the heel of a short-row sock.  You won’t want to miss it!

Thursday, November 17, 2011

Knitting Tip: How to Straighten the Cord on Your Circular Needles


My circular needles came coiled up in little plastic packs, which meant their cords were forever stuck in an annoying circular shape.  My knitting was hard to slide down the cord and sometimes came at me from an awkward angle.

How on Earth am I supposed to knit with this thing?

I forget where I learned this tip, but I remember that it was early in my knitting career and I thought, Why didn't I think of that?  Maybe you'll think that, too – or maybe you already have!  Either way, this little tidbit has helped me a lot in my circular knitting, and I hope it helps you, too.

How to Straighten the Cord on Your Circular Needles

1. Heat a large pot of water on the stove but don't bring it all the way to a boil.  Pre-simmer is perfect.


2. Dip the cord of your circular needle into the hot water and hold it there for several seconds, maybe 15 or 20.

3. Hold the cord between your thumb and forefinger in a tight pincher grip and slide your fingers down the length of the cord to straighten.  (I'm sorry I couldn't take a photo of this step -- I didn't have enough hands!)  Don't attempt to just pull the cord taught with one end of the needle in each hand -- this could stretch the cable and possibly pull it apart in a weak spot (it almost happened to me the first time I tried it!). 

If it didn't work to uncurl the cord, dip it back in your hot water for a slightly longer period of time and try again.  Don't forget to hold the cord straight while it's cooling, otherwise it may snap right back into its original curled-up state.

Here's my final result:


It still has some curl in it, but it's a big improvement over its initial state and is so much easier to work with.  The curl will eventually snap back after the needle has been in storage for a while.

I hope this tip is helpful to all the knitters out there.  If there are other techniques or tips you're interested in hearing about, please leave a suggestion in the comments!

Saturday, November 5, 2011

Knitting Tips and Techniques

You may have caught on by now that I'm a knitting geek.  Not only do I love to knit and all things knitted, but I also love the how and the why of knitting.  I like examining a piece to see how it was made, and checking out store-bought knits to see if they were hand knitted, as their label sometimes states (the seams and the plumpness of the stitches are dead giveaways).  I also enjoy learning new techniques and knowing all I can about my favorite hobby.  Just like my brother is a technical guitar player, I'm a technical knitter.

I had hoped to share knitting techniques and tips on my knitting blog, all. about. knitting., but I really don't have time to write on a second blog (what was I thinking?), and I just couldn't keep up.  So instead I'll share them occassionally here -- interesting tips or techniques I hope knitters will find useful.  But non-knitters, don't worry -- I won't innundate the space with "boring" knitting techniques -- after all, they're not boring!  Just kidding.  You get the idea.


I’ve already created my Knitting Techniques page and brought over my first tip from my re-defunct knitting blog, How to Wrap and Turn.

My first new tip will be how to straighten out the curled up cable on your circular needle.  Stay tuned!
Related Posts Plugin for WordPress, Blogger...